 ..
.. ..
.. ..
..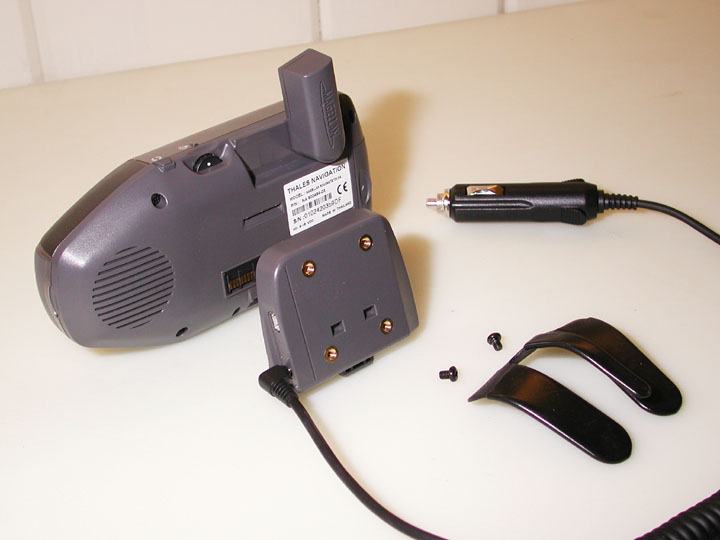
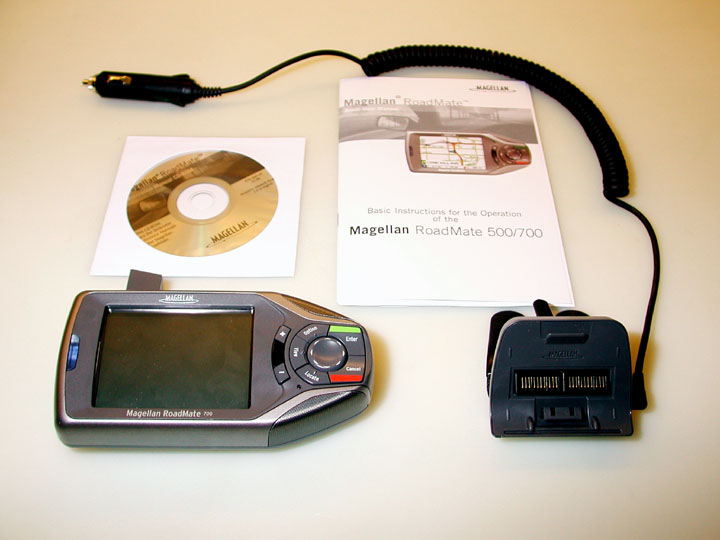
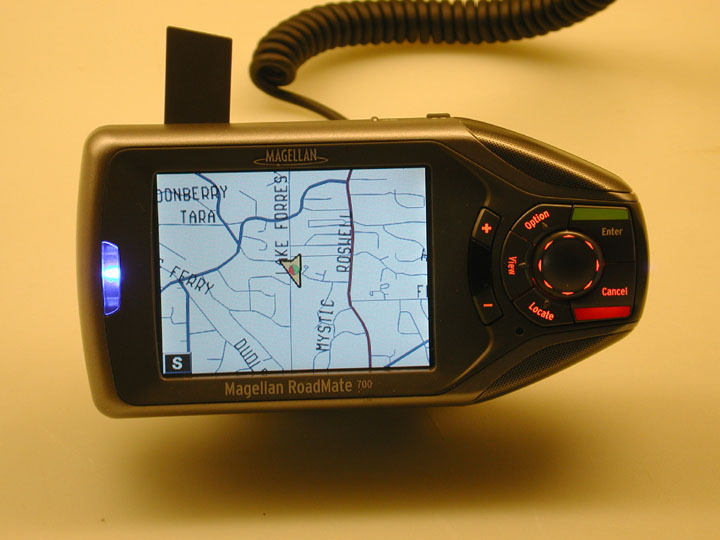
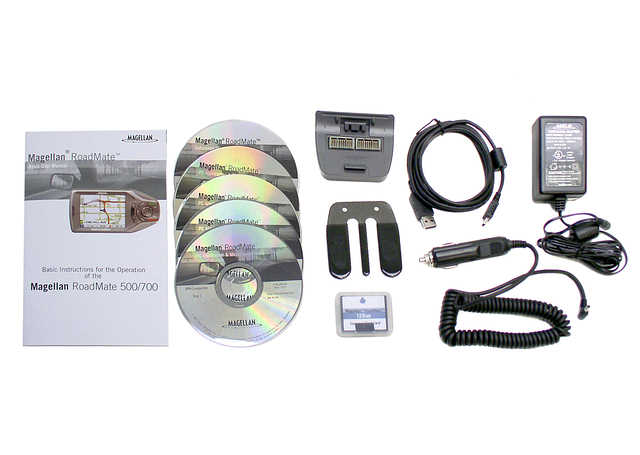
RoadMate 700 Kit * Screen Display with Back-lighted Keys * RoadMate 500 Kit * Exploded View
......
RoadMate
General Description:
The two RoadMate models are identical, with the exception that the
700 has a 10GB internal hard drive and the 500 does not. They operate
the same and differ only in how the map data is stored in the unit.
The RoadMate 700 has all the data for North America pre-loaded on an internal
hard drive; the 500 requires the user to load the desired data to a Compact
Flash (CF) card. Alaska and Hawaii aren't included in the packages.
(There is also a difference in package contents -the 700 does not include
the A/C adapter, USB data cable, and CF card found in the 500 package).
The unit has a jack for an external amplifies antenna.
This is a solid unit with a large, bright touch screen, great speaker, easy to use controls, and an intuitive interface. From a hardware standpoint, the major weakness is the supplied mounting bracket, which slips into a dashboard vent. It works, but any of the forthcoming mounting options would seem to be better choices. The RoadMates are configured more like an "installed" unit -and not for the "GPS Enthusiast", since it has no way to record and download or upload waypoints recorded by other Magellan units.
The supplied mapping data from NavTech seems fairly complete. The NavTech data appears to be from late 2002 or early 2003 which is about as recent as any comparable unit. The main navigation screen shows you all the key information at a glance, and the voice prompts (and tone prompts for turns) are generally timely and accurate. The "repeat" button on the top of the unit provides an update of the most recent prompt at any time.
Magellan says that the RoadMates are a descendant of the Hertz NeverLost® system where over 4 million drivers have enjoyed the ease and confidence of navigating their driving with Magellan GPS. It's very user-friendly, despite the lack of detailed information in the provided documentation.
700:
The Magellan RoadMate 700 (about $1,200),
get latest prices (HERE),
is Magellan's latest entry into the Automatic Car Navigator arena.
The RoadMate is a quality product, in fact, we rate it as a breakthrough
new product in that it is the FIRST Car Navigator that we have tested that
is ready to operate "out of the box" as it comes. The RM700 has a
10GB micro disk drive which has been preloaded with road maps for ALL of
the USA and the southern most (high population) areas of Canada.
RoadMate 700 is portable and ready to use when you take it out of the box. To start, you plug it up to your car's lighter socket, stick the (rather kludgey) mounting prong into your air vent and you are ready to program your first destination address using the easy to understand touchscreen controls. The system comes packed with the RM700, power cable, CDROM reference manual, quick start guide, mounting device and that is all there is to it. The map software is already stored on the micro hard drive ready to go!
500:
The Magellan RoadMate 500 (about $900), get
latest prices (HERE),
comes with a startup kit: RoadMate 500 unit, universal mount, dashboard/air
vent mounting bracket, cigarette lighter power for car use, A/C adapter
for home use, standard mini USB to USB cable, 128 MB pre-authorized CF
card, printed doc ("Read Me First" fold out, PC application Quick Start
Guide, Basic Operation Instructions Manual, extended warranty info, registration
info, promotional material), documentation CD (65-page reference guide
and 9 page Welcome doc which provides a good overview of the unit, but
is more marketing document than anything) and 4 CD software and mapping
data package.
The necessary drivers to connect your PC are automatically installed
when you install the software, except under Windows 98. Windows
98 should recognize the RoadMate as a mass storage device. You must
install the driver (umrm.sys) when prompted. It is on CD #2 (in directory
"MRM Driver 98") or can be downloaded from the Magellan Support page
(https://www.magellangps.com/en/support/products/magellanroadmate500.asp)
When Windows 98 prompts you to "Please insert the disk labeled 'USB Mass Storage Driver Disk'", select the directory on CD #2 or the location to which you unzipped the downloaded file. (If Windows does not detect the RoadMate, see the Windows 98 driver document on the support page).
The initial setup is simple. Follow the "Read Me First" poster included in the box. Don't even bother with other doc, some of which is confusing (the pamphlet with basic instructions for uploading map data to the RoadMate has a reference to a non-existent RoadMate 300, indicating that the ability to change data on the CF card would be locked out after 45 days. There is no such restriction with a 500 or the 700).
Common Features:
The RoadMate is a well-designed, portable
unit, with a large, bright color touch screen and easy-to-use controls.
The user controls are to the right of the screen - Enter, Cancel, Locate,
View, Option surround an 8-way thumb pad, with +/- zoom buttons.
There is also a (currently unused) IR port between the "+" and "-" keys
and a light sensor between the "Locate" and "-" keys that is used when
you set the automatic brightness option.
There is a very effective built-in multimedia tutorial that covers all aspects of operation. To run it, press the OPTION key and select TUTORIAL. The RoadMate then provides a very complete tutorial with video and audio describing basic operation of the system. This virtually eliminates the need to access the CDROM manual for normal operation and use.
The RoadMate has about the easiest user interface to use we have seen in a car navigator. There are seven push buttons for major functions (VIEW, OPTION, ENTER, CANCEL LOCATE, +, -) plus a speaker volume control, repeat voice command key and an OFF/ON switch. The RM is designed without internal batteries (similar to the competitive StreetPilot 2610/2650) and operates ONLY when plugged into an external 10 to 24 vdc power source. The RM unit automatically turns ON and OFF with the power application from its external power cord. A lighted power switch is provided to turn the unit on and off manually as desired.
Operation, routing and re-routing are very fast - much faster than in the Hertz system. We tried to trick the unit a few times by missing turns on purpose with very close turns required but it correctly recalculated the route every time.
The RoadMate was designed from the ground up to economically replace the combination of GPS/Laptop Computer/Mapping Software system that many use to maneuver around cities in the USA. Roadmate has two million Points of Interest (USA and Canada combined) and offers a variety of ways for the user to input destinations. The user can input ADDRESSES, select an entry from his ADDRESS BOOK, select from lists of RESTAURANTS, ATM, GAS STATIONS, AIRPORTS, AMUSEMENT PARKS, BANKS, BUSINESS FACILITIES, BUS STATIONS, CAR RENTAL AGENTS, CASINOS, CITY CENTERS, CITY HALLS, COMMUNITY CENTERS and a host of other classifications. Input of Addresses worked VERY well and VERY easily. Restaurant, and Gas Station categories worked pretty well, but we found the listings for some other categories for our area pretty sparsely populated. You can also input an address as a road intersection. This selection is preceded by the selection of a City or State to narrow the possibilities.
Another major feature is the Trip Computer which provides a running computation on Average Speed, Trip Time, Drive Time, and Trip Distance. At any time, you can SAVE the "Present Trip Computer Information" in a user named file on the hard drive. The user can then revisit this trip log "snapshot" at any time by recalling the name.
RoadMate (500) Maps:
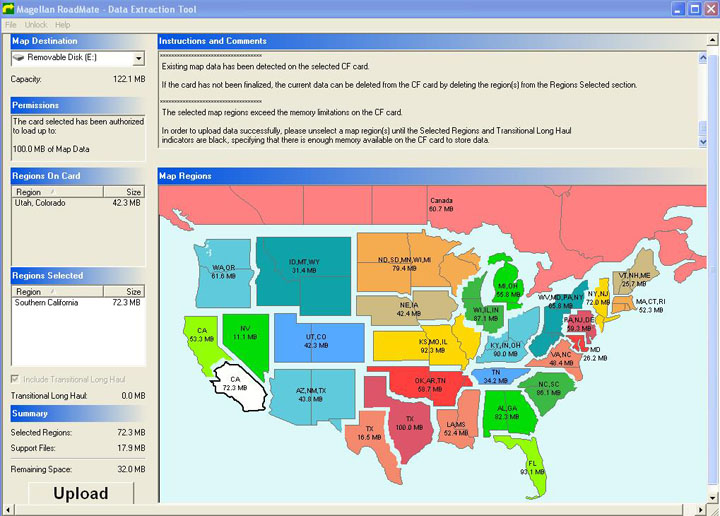
The following is an overview of loading maps
to the RoadMate 500. Above is a map of the main PC application screen.
(The following instructions assume you are
using WindowsXP and that the PC is running. Procedures on other Windows
versions should be similar).
1) Make sure the CF card is inserted into the
RoadMate.
1) Turn on the RoadMate 500.
2) Connect the small connector to the RoadMate
connector, just above the power connector.
3) Connect the USB connector to the PC.
Windows should recognize the RoadMate as a
USB device (removable disk drive). The RoadMate screen will display
a message "The USB has been connected to the unit. Please follow
directions from the PC application for updating maps or software".
If neither happens, power off the RoadMate and turn it on again.
(Steps 1 - 3 can be skipped if the CF flash card is installed directly
into the PC).
4) If you haven't already done so, install
the "Magellan RoadMate - Data Extraction Tool" from the CD #1. You
need about 25 MB disk space to install the tool, about 2.5 GB if you want
to store all the map data on the PC. (If you only load the software,
you will need the CDs when you load new region data to the CF card).
5) Start the program.
6) You will see the main screen for the data
extraction tool (see picture above).
There are three areas of the screen:
a) information and instruction area
b) a map of North America, showing the available
regions and related database sizes
c) Card status area (Map Destination, Permissions,
Regions on Card, Regions Selected)
The Map Destination is where the map (region)
data will be loaded. This will show as "Removable Disk (E:)" or whatever
drive letter was assigned to the RoadMate, and will show the formatted
capacity of the card. Permissions will show how much space for map data
has been authorized for the CF card. The CF card supplied with the
RoadMate 500 will show 100 MB. "Regions on Card" will show which
regions are currently loaded on the card. Initially, this will be
blank. (In the above screen capture, the "Utah, Colorado" region
is loaded on the card).
7) Select the region(s) you want to load by
clicking on them in the map area. The selected region(s) will turn
white and will display in the "Regions Selected" area. As long as
the selected data will fit on the card, the "UPLOAD" button on the bottom
left will be selectable. In the above graphic, "Southern California"
has been selected as the region to load to the CF card. (This will
overlay the existing data on the card).
8) Select "UPLOAD" to move the data to the
CF card. The time required for this will vary, depending on the total
amount of data selected and whether the region data has been previously
loaded to the PC. If data must be loaded from the CDs, you will be
prompted to insert the appropriate CD(s) as required. A splash screen
will show the load status through 4 steps.
9) When the load is complete, detach the USB
cable from the PC.
The initial CF card installation was confusing - the door opens opposite of what you would expect. You push it open, but the door springs up back in toward the unit. Inserting the CF card is not obvious - the top card points to top of unit, but when you open the door you will almost certainly have the front facing down. Also, there is no eject button for the card -very disappointing, especially given the engineering used for the door mechanism. There is a fabric "pull strap" on the supplied 128 MB relabled SanDisk CF card to facilitate removal. It isn't easy to get a card w/o such a strap out of the unit.
The CF card comes pre-authorized for 100 MB of data, strange given it's a 128 MB card. One authorization code for a user-supplied card comes free with registration; additional codes are $50 each. If your second card is 256 MB, 512 MB or better, you can store all the map data you'll need on a trip, (you need about 2.4 GB to store all the current data for US and Canada). Magellan has tested cards up to 1 GB in capacity and did not test with any microdrives. On the 700, the internal 10 GB hard rive has all the data preloaded, so the CF isn't used (except to record screen shots). There are some that have complained about the $50 authorization fee - We don't like it, but are going to get a large capacity card for our second card (which you can authorize for free), so the fee won't be a factor for us.
The mapping data is organized by region - more like states and partial states - you can't select subsets and must load entire states and/or regions. For example, in Colorado one has to load the Colorado/Utah region, You can't just select Colorado. The PC tool is a bit primitive, but it only does two things - load data to a CF card and authorize new cards. The RoadMates don't come with a base map.
An interesting choice for the application name - Why isn't it called the "Data loading tool"? The main button to load data to the unit is labeled UPLOAD. You can choose to load just the program (about 25 MB) or any/all of the region data to your PC. You can't really "extract" any data (for example, look at the points of interest data on the PC), the program just loads the selected mapping data to a CF card (either attached directly to the PC or through the USB cable to the RoadMate).
Now
- How Do I Actually Input an Address?
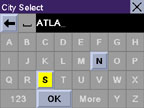
Entering addresses or searching is very easy
with the "quick spell" feature. When you select a letter (by touching
the screen or using the thumb pad), only valid choices for the next letter
are available. This makes entering address information very fast.
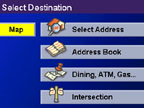
1) Press the View button; this brings
up the options of the Map -or, Select Address, Address Book, Dining-ATM-Gas,
and Intersection.
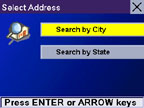
2) Press Street Address, Search by City, spell
the city, select the displayed city, spell the street, spell the street
number.
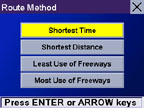
3) Select: Shortest Time, Shortest Distance,
Least Use of Freeways, or Most Use of Freeways.
4) Enter, and the unit calculates the route,
and displays a Maneuver List with all the expected turns
5) Press View to toggle between the map, the
Maneuver List, or turn directions.
6) Press Option to select Trip Computer, Configuration,
or Tutorial.
7) Press the Cancel button to cancel the guidance.
 .
. .
. .
. .
.
Series of operations to route to an
address (keying address not shown)
 ..
.. ..
.. ..
..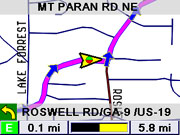
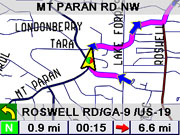
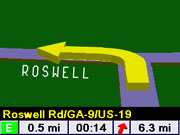
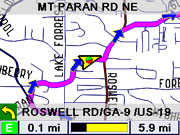
Sequence of route-map
direction prompts. 1st -normal zoom, 2nd -early 3-D warning, 3rd -automatic
zoom in, 4th -zoom closer.
In the Route Map,
the Current Street is at top. Turn-on-to street lower.
Dist. and time to turn-on, direction and Dist. to Dest. is at bottom
See the "Hidden Menu" and additional screen shots (HERE)
Once the route is canceled, its address is stored under: View, Select Destination, Address Book -where it can be retrieved by selecting Previous Destinations. On that page is also List Addresses that have been saved, or Create a New Entry. Information is stored in non-volatile storage and is not lost when the power is disconnected or the mapping data is changed. There is also an IR sensor (currently unused) and a light sensor (used to adjust screen brightness).
NOTE: In order to create a new (address) entry, one must go back and Search by City which requires all the same keystrokes as before. It would be quicker, if the unit remembered the last city or the present-position city.
On the main map screen, you can zoom to 350 feet, 700 feet, 1/4 mile, 1/2 mile, and then 1, 2, 4, 10, 20, 50, 100, 150, 350, 700 miles. The detail close in was good. Panning can be done with the touchscreen; just touch-and-drag the map. When the map is panned (with either the touch screen or keys), the street names are displayed for those streets not labeled on the map.
When a route is calculated, the main screen shows your location, your current street, and a status lines at the bottom of the screen shows next turn/maneuver, street name, signal strength, direction, distance and estimated time to next maneuver, and distance to destination. You can set the map to always show north and/or scroll, but the default is preferred, which shows your car in the center of the screen. The colored box surrounding the current direction (in the lower left-hand corner) indicates the current signal strength. Black -acquiring position. Blue -WAAS signal (best signal), Green -Strong Signal, Yellow -Average Signal, Red -No Signal. If you loose a signal (red), the unit will automatically switch to the "Maneuver List" view to allow for manual routing and will switch back once the signal is recovered.
By default, the display automatically switches to a 3D turn view shortly before a turn is required and will switch back to the map and "zoom in" just before a maneuver is required. Different tones for left turn ("ding dong"), right turn ("dong ding"), and keep straight ("ding ding") are used in conjunction with the voice prompts to guide you. If you miss a voice prompt, you can hit the repeat button to update/repeat the last direction. You almost never have to look at the screen!
There currently isn't a way to back up any address book data to a PC, but there is an undocumented feature that allows you to take capture screen shots to the CF card.
Screen
Captures:
On either of the RoadMate units, you can capture
screen images as Bitmaps to the CF card. (On a 700, you must have
a CF card inserted, since the images will not save to the hard drive).
You can capture any screen image as long as there is room on the CF card
and that the unit is NOT connected to the PC.
To capture a screen image, hold down the "Repeat" key (on top of the unit) and hit "View". You will see a message "Writing Bitmap file to E:\PIC-n.BMP" where "n" is the current picture number, starting with 0. (e.g. the first picture will be PIC-0.BMP, the second PIC-1.BMP, etc.).
The resulting files are approximately 150K each and 240x320 pixels. The pictures need to be rotated 90 degrees counterclockwise to use the same orientation as the RoadMate. The files can be moved to the PC after connecting the USB cable. Once the files have been moved, delete them from the CF card.
Specific Questions Answered:
NOTE: There is an undocumented way to establish your current location as a destination/way point for future use. When you are in map mode, jog the current position away and then back using the thumb pad. Then hit "Enter" to enter "Routing" mode. That destination (which should be your current position) will now be available in previous destinations and can also be saved in the address book for future use.
5) How can I load my own maps (Delorme, Topo,
USGS, etc.) into the RM700? You cannot. Only maps furnished
by Magellan can be loaded into the RM and they are already supplied.
6) How many VIAS can I set up in the RM to
direct the routing to go the way I want? None. RM does not
presently support vias.
7) Do you think my wife (husband) could operate
the RM. Well.. My wife can operate it and it is the first car navigator
that she has volunteered was VERY EASY to program.
8) Do you think the Screen is easy to read?
Yes. The display is large and excellent quality. The colors
are good and the general presentation is good.
Things
we do not Like About the Roadmate:
1) The air conditioning vent "prong" mount
is pretty unsatisfactory. It will get you by until you can come up
with something more permanent. The unit on the prong mount wants
to rotate right or left (tilt) and this makes it hard to read and it is
not very stable when you are trying to press the buttons.
2) The voice commands in complex city interchanges
are a bit late in coming (sometimes).
3) The day/nite changeover would best be handled
automatically at dawn/dusk and the nighttime brightness adjustment should
be independent of the daytime brightness adjustment for your own area IS
a great convenience.
4) A "conventional" compact flash card is
difficult to remove. There is no "eject" lever for it.
Areas
for improvement:
1) It would be nice if there were an option
to read the upcoming direction. Instead of "Left turn in point five
miles". Better would be to set an option to add the street, as in
"Left turn in point five miles to Main Street".
2) Some of the voice prompts do not match
the text on the screen. The text says "Select Address", prompt says
"Street Address", Text says "Dining, ATM, Gas ...", prompt says "Points
of Interest".
3) There is no way to flag POIs as bad if
the address in the database is incorrect.
4) There should be an option to turn off confirmation
tone when moving cursor or pushing buttons.
5) "Perform the Action" should be context
specific - e.g. on the Cancel Guidance screen, "Yes" choice should read
"Cancel Guidance?" or "Cancel Route?" and "No" should say "Return to Route"
or "Do nothing" or something like that.
6) There needs to be an option to exclude
regions or states from route or POI displays so that searches can be restricted
to my current region of interest. You can do this with the 500 by
loading only the regions you want, but if you have most of the US loaded
for a long trip, one would like to exclude searches without having to carry
a laptop to reload the CF card. Ditto on the 700 - if you select
any other than "Nearest" for points of interest, there will be a lot to
search!
Despite the items above, this is a great unit
and the easiest to use Car Navigator User Interface we have seen.
7) In Previous Destinations, there is no delete
option. They will scroll off, but you should be able to delete them,
as you can in the address book.
8) The color of the 'direction' box for GPS
status, is too far away from the action to be readily noticeable. It would
be better for the cursor to change colors. Other GPS we've evaluated
put the GPS status info on the cursor -where it's more visible.
9) The ability to add "vias" (as with the
Garmins) would be helpful.
10) The ability to view that map at the destination
without having to pan (also as with the Garmins) should be available.
Personal Comments from Co-Author Jim Hicks Follow:
I didn't pick the 700 because (a) it had a hard drive, (b) didn't have the AC adapter and USB cable and (c) was about $300 more. I can load all the data I use on a daily basis on the included 128 MB card, so I don't really need it all preloaded. In addition, with the price of CF cards dropping, it won't be too long before I can get all the data on a CF card for less than the difference between units. Magellan must also expect more warranty service on the 700 as well - the extended warranty coverage (extend the 1 year warranty to 3 years) is $129.95 for the 700 and $99.95 for the 500.
If you need "don't do anything, just turn it on and have all of the USA and Canada maps already loaded", the 700 is a great choice. However, if you can use a PC at all (and if you are reading this, you can!), I think the 500 is a good choice as well.
Happy automatic "touchy feely" driving with Magellan -from Joe, Jack, and Jim!